Katherine Harriet

Monday 16 April 2018

Prawn and Orange Summer Salad


Hello! Today I worked from home as our Landlord was coming over to have a look at (and I hoped - fix) the bathtub tap. Unfortunately he couldn't get this done today and so I still can't use the Easter bath bomb my mum got me.

Anyway, as I was working from home I decided to make a big hearty salad to keep me going for the afternoon. I really fancied something refreshing, zingy, a little hot and full of flavour. There is nothing worse that a watery lettuce salad with a few sad tomato's. So this had to taste good, and as the sun has poked his head out for the first time in what feels like the longest winter of Westeros... I wanted something fruity.

I had these prawns already marinated and in my fridge. The reason? On Saturday I was expecting some friends over to watch the Grand National while we all lost our money. However this didn't happen - my friends were showing potential buyers around their house, and me and my other half won money on the Grand National instead! Result.

So I had the prawns in, they have been sitting in a marinade of the following since Saturday mid day - so have had two days of good soak up time at the time of cooking. But 20 minuets in the marinade will be just as effective. You just need a tablespoon of chilli sauce, whatever heat and type floats your boat (I used 'West Indian Hot Pepper Sauce') The juice of 1 lime, and a teaspoon of honey. Mix it all together and toss your prawns in. This marinade would also work wonderfully on chicken, or on other fish like salmon or crab.

If you are using a sweet chilli sauce - skip the honey. But really the trick is to dip your little finger into the mixed marinade before adding any raw meats/fish. That way you can adjust if you need to, add some salt if needed, crush in a garlic clove, splash in some soy. Really using those three ingredients you can just play around with various different flavours and additions until you have a flavour you're happy with.

You could then put your marinated meat onto skewers and grill on the BBQ, or slather the sauce on some salmon fillets and bake, serving with green beans and boiled potatoes... really this is so versatile so once you have the basic marinade the way you like it, the possibilities are endless!

Anyway, this is everything you need to make this gorgeous fun salad!


Ingredients
Olive Oil or Spray Oil for frying/grilling
24 King Prawns (pre-marinated in chilli and lime - see above)
20g of Feta Cheese
1 Red Onion (finely sliced)
165g Sweetcorn (drained)
1 Handful of Red Baby Leaf Lettuce
1 Handful of Green Baby Leaf Lettuce
1 Handful of Baby Leaf Spinach
1/2 Cup of Rocket (roughly)
1 Bunch of Coriander (chopped)
1 Bunch of Parsley (chopped)
1/2 Orange peeled and sliced
1/2 Orange Juiced
1/2 Lemon Juiced
1-2 Tablespoons of Soy Sauce
1/2 Teaspoon Salt
1/2 Teaspoon Cracked Black Pepper

Method
Heat up a frying pan or grill pan to a medium heat on the hob. Lightly oil or spray, wait for the oil to move freely, or for the spray to have turned clear and throw in your prawns to cook. Grill/Fry for about 2 minuets per side until opaque and pink.

While the prawns are cooking, toss both the baby leaf lettuces, spinach, rocket, coriander and parsley together in a large bowl. Scatter the thinly sliced onion and sweetcorn over the leaves. Add sliced and peeled orange segments on top. Crumble the feta all over.

Once the prawns have finished cooking add these to the salad. You can toss at this stage, but you have built up a beautiful colourful salad, if you toss the salad you will lose the aesthetic of this, which is fine if you're making for tupperware for lunches during the week, but not so good if you want to put this pretty dish on the table for dinner.


Squeeze over the juice of the orange and lemon. Add the soy. To cover nicely move in a zig-zag movement when applying the juices and soy, so every mouthful is busting with flavour. 


That's all there is to it! I think the fruit is what really makes this salad so special, If you had some pomegranate seeds I would add these as well to add a bit of ruby-red colour interest, texture an sweet fruity bursts of flavour.


If you make this gorgeous, delicious salad, please tag me on instagram (@kharri3t) or twitter (@kharriet) I love seeing your photos. Plus I'm a hungry hungry hippo so just like looking at pictures of food!

Kat Bull x

SHARE:

Thursday 13 July 2017

Butternut Squash and Bacon Cannelloni


Hey hey hey! Recently, since moving in with my boyfriend, we have started something of a farm. Growing everything from Strawberries to Squash, Beets to Lemongrass. We are growing it all. Which means I am having to think of new and quick ways to use all our produce. So I have also been watching a lot of Food Channel, and one of the shows inspired me to make this.

So this is my Butternut and Bacon Cannelloni. I made a total of eight cannelloni, only I couldn't get hold of any actual Cannelloni, so I used rolled up Lasagne sheets.  This is sweet, salty, carb-y, and cheesy. The 4 main food groups! 

+ This is how you do it:

Butternut Squash and Bacon Cannelloni (Serves 2)
- 1 Butternut Squash
- 4 Rashers of Diced Bacon
- 2 Large Handful's of Spinach
- 8 Cannelloni/8 Lasagne sheets
- Grated Manchengo Cheese (no measurement - put on however much you like!)
- 1/2 Can od Chopped Tomatoes 
- 2 Cloves of Diced Garlic
- 200ml of Chicken Stock
- Salt + Pepper to Taste
- Olive Oil


- Peel, seed and dice the butternut squash into 1 inch chunks, toss in a little olive oil and season. Roast in the oven at about Gas 4/180C/350F for about 40 minuets - 1 hour until a knife falls through easily.
- If you are impatient, like me, and a bit soft is enough for you, take your squash out the oven, transfer to a blender, pour over the chicken stock, and blend until smooth. Otherwise, once it's soft, add the chicken stock and mash together. Once out of the oven, do not turn it off, you will be using it again in a tick.
- Next prepare your pasta. I don't mean boil it until cooked throughly, I just mean sit them it in hot water until slightly soft and malleable. This will make it cook quicker as well.
- Fry your bacon in a little olive oil with your diced garlic. Add in your two handfuls of spinach and allow to wilt down. Add your mashed/blended butternut squash, give it a good mix around, and take off the heat - season at this point if required.
- Using a teaspoon, spread a thin layer of chopped tomatoes on the bottom of your oven proof dish to stop the cannelloni sticking whilst it cooks.
- Fill your cannelloni using a teaspoon by filling up one end of the cannelloni up with your squash/spinach/bacon mix until there is a good layer all the way through. If using lasagne sheets, put a dollop of your filling at one end, smooth out a little, then roll up.
- Line your cannelloni/lasagne rolls up in your oven proof dish closely together to stop them from unraveling. 
- Spoon a little more of the chopped tomatoes on top, followed by any of the fill mix you may have left.
- Put back in the oven at the same temperature as before and bake for between 30-40 minuets to allow the pasta to finish cooking.
- 5 minuets before you take the cannelloni out of the oven, add your grated cheese and any extra seasoning you think it may require.
- Once out of the oven, pop on a plate, an enjoy!!


My boyfriend and I love this, I think this is definitely going to be on our dinner rota from now on. This is a fantastic meal, for mid week, or even if you're having friends over, as the actual prep and cook time you have to be in the kitchen for is probably about 15 minuets, other than that, you can just leave the oven to do it's thing. 

This can so easily be vegetarian as well, simply skip the bacon, and use vegetable stock instead of chicken, and you'll have an equally delicious, sweet/salty meal meat free!

I hope you love this recipe as much as me and my other half did. Feel free to share any pictures of this on Instagram with me!


Kat Bull             -  

SHARE:

Saturday 29 April 2017

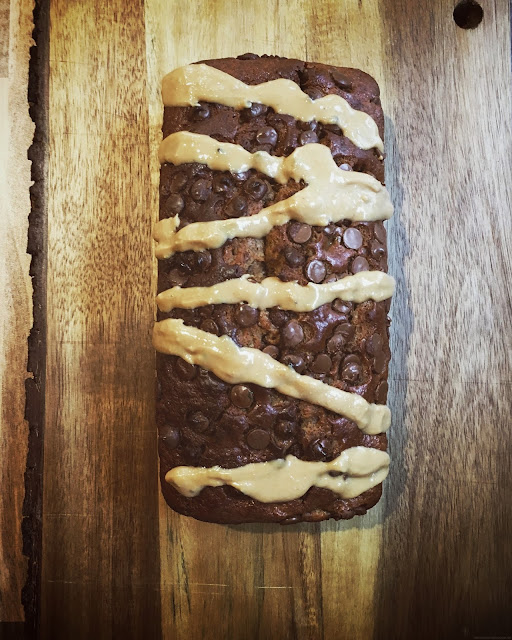
Peanut Butter Banana Bread


Good Morning! Today I am sharing with you a little recipe that has become a bit of a staple in our house. I moved in with my boyfriend in January and before then, peanut butter was conspicuously absent from my family home - no one was really a fan. Since moving in with Steve however it seems you're always a few feet away from peanut something - and I have discovered so long as it's heavily sugared or heavily salted then I'm a peanut fan too.

The reason I first made this is because we are fantastic at shopping for healthy foods - not so good at eating them (see pictures) so one day on our weekly shop we bought the biggest bunch of bananas ever thinking 'hey we can eat these for breakfast, on our way to work or as a snack this is great!' 

So we ate a few and they progressively gained more brown spots, so one day I thought of a way to make us eat them - Banana Bread! So I went through my cupboards and found I had the following things to make it taste nice - peanut butter, chocolate chips and vanilla extract so I got to work.


Ingredients

1/2 Cup of Melted Butter (plus a little to grease the pan)
1 Cup of Plain Flour
1 tsp Baking Powder
Pinch of Salt
3/4 Cup of Light Brown Sugar
1/4 Cup of Milk
1 Squeeze of lemon juice (just a little bit!!!)
2 - 3 Ripe Bananas (mashed)
1/4 Cup of Peanut Butter x2 (not 1/2 trust me - you need two 1/4 cups - V. Important)
1 Glug of Vanilla Extract
1 Large Egg
1 Yolk from an Egg
1 1/2 Cups of Chocolate Chips

Method

Preheat the oven to 180˚C/350˚F/Gas 5. Grease up a loaf shaped baking dish.

In a bowl pour in the flour, salt, and baking powder, mix it all up.

In a second bowl (of jug if you're like me and only have the one mixing bowl...) mix up the sugar, bananas, 1/4 cup of peanut butter, milk, lemon juice, vanilla, egg and egg yolk until it's all a smooth golden-y colour. 

Pour your wet sugar/peanut/banana mix into the dry and fold it all in until it's combined. 

Chuck in 1 cup of chocolate chips - saving the other 1/2 cup. Mix in the choc-chips until well dispersed.

Pour the mixture into the baking dish and sprinkle the last 1/2 of chocolate chips on to. (You don't have to use a full 1/2 cup - it depends how much of a chocolaty top you want - I like mine V.V. chocolaty)

Pop in the oven and bake for 45-60 minuets. Mine was the bottom end of this so check regularly. Set an alarm for 30 minuets and check it then and see how long it needs, and set your alarm for every 5-10 minuets from then. It should be golden brown and a toothpick of knife inserted should come out ~mostly~ clean. I say mostly because I like mine a little gooey like a brownie texture - you may want yours more cakey.

Take in out the oven as soon as it's ready and leave to cool in the pan.

Once cool run a knife around the edges to release the banana-ry goodness and tip out onto a plate/chopping board. Then flip it over again because it will have come out the pan upside-down.

Put the other 1/4 cup of peanut butter in the microwave for 30 seconds, and then using a teaspoon drizzle it over the top of your cake.

+++ done. Make a coffee and grab a slice.


This is truly a fantastic cake, I made it at the weekend, me and Steve managed to devour the whole thing in two days, and then when I went back to work and showed a picture of it to the girls they demanded I bring in another the following week. So now this is a winner at home as well as the office.

I hope you enjoy it!!!

SHARE:

Tuesday 14 February 2017

What I'm Wearing: Wooden Spine

Hey, sport's fans. It's been a while since my last WIW post - 6 months to be exact - but the other day I was just slobbering around the house (my brand new house by the way) in jeans and jumper and just felt so un-me. So I had a quick rifle through my wardrobe and found this little black slip dress. At first, I dismissed it as a 'not for another few months' dress, you know, seeing as it's threatening snow on the South Coast every day... But then I remembered my mild obsession with ribbed turtle neck jumpers, so I thought... to layer or not to layer?

So I layered.


Black Slip Dress - Topshop (similar)
Grey Ribbed Turtle Neck - Topshop (similar)
Agate Slice Necklace -  Crystal Cactus
Celtic Knot Necklace - Gift
Aztec Style Oversized Earrings - Not The Same But Super Cool
Cat Tapestry Lita Shoes - Jeffrey Campbell
Velvetines Lipstick in 'Squash' - Lime Crime
Venus Palette II Eyeshadow in 'Filter' - Lime Crime

I felt much cuter this day than I would have done had I stayed in my thick cosy jumper and super relaxed jeans. Don't get me wrong - I love my jumper and jean combos, but I am loathed to spend so much money on summer dresses every year, for them then to spend nine months in the 'seasonal' part of my wardrobe. Grab a turtleneck, a pair of tights and layer your way through the SAD months, and keep looking East for the day the sun shines bright and hot again!


SHARE:

Thursday 5 January 2017

2017

First things first; Happy New Year! I know 2016 wasn't all that great in the world news, (which when Nico Rosberg wins the world championship over Lewis Hamilton... well), but anyway! Onwards and upwards, we're into a new year and I hope the best comes for all of you.

I think one of the first things I need to do in this opening post is to address where I've been whilst on an unannounced hiatus. In July I got promoted to Manager in the company I work for. I was now managing my own coffee shop (YAY). Only this coffee shop was now a two-hour drive in rush hour traffic away from my home, and I was working between 46-58 hours a week, plus driving to and fro each day. So for that reason, I never really had the time to write a blog post, no matter how much I wanted to. 

Then because the commute was so horrendous I started living with my boyfriend a few days a week, he only lives about 20 minutes away from my shop, and as the weeks went on, it stopped being a few days a week where I would see him, and evolved into me saying 'I'm going home on this day this week'. So essentially we're at a point now where just one day - I never went back home.

You might think that should have given me more time to write my blog posts, but when you're working 46-58 hours every week, plus getting called in on your days off, getting calls from members of staff the second you get home and living with your SO and his housemates (who are a couple as well btw) and trying to maintain a social life, and see friends who live a few towns over, and who work opposite hour to you, or who are doing a year teaching in china, or who are working in the capital living out their dreams - well... it's tricky.

Therefore I am beginning this year on my blog the same way I started it everywhere else - with a photo and an announcement. 


We are welcoming in 2017 with some fantastic news. I start a new job in Finance next week, and we are moving into our first house together later this month. We couldn't be more excited to begin this step in our lives together and can't wait to make some more amazing memories in our home. 

Because I start a new job (with fewer hours and guaranteed weekends off) I will be back to posting blogs regularly, and I think Steve may make a few more appearances on here too, as we move into our house, and try to make it a home, and attempt some degree of self-sufficiency while we're at it. 

Hope you all had a fantastic Christmas and New Year and I'm looking forward to going through 2017 with all of you.

SHARE:
© Katherine Harriet | All rights reserved.
Blogger Template Created by pipdig